The last of the demo videos about using the Syndeia Web Dashboard Generic RESTful API capability uses Vitech GENESYS as an example of dynamic token authentication. Part 5 references the video Demo 29.6 – Integrating RESTful Repositories using Dynamic Token (OAuth) - GENESYS.
This work comes from an ongoing collaboration with Zuken Vitech, creators of the GENESYS system architecture modeling tool. Additional work from this collaboration includes using Jupyter Notebooks to query GENESYS models and a forthcoming full integration in Syndeia release 3.6. For the differences between full and generic RESTful API integrations, see Part 4 in this series.
The Demo 29.6 video follows a similar outline to the others in this series:
- Integrating a RESTful repository using a Dynamic Token
- Adding and executing RESTful Requests
- Get projects in a repository
- Get a project by id
- Get components in a project
- Get requirements in a project
With a dynamic token, the repository generates and returns the token to a request from the user. The Syndeia Generic RESTful API integration will cache this token and use it for subsequent requests. The tokens expire after a fixed time (e.g. 30 minutes) or a period of inactivity (e.g. 2 minutes). When the token expires, Syndeia will automatically request a new token.
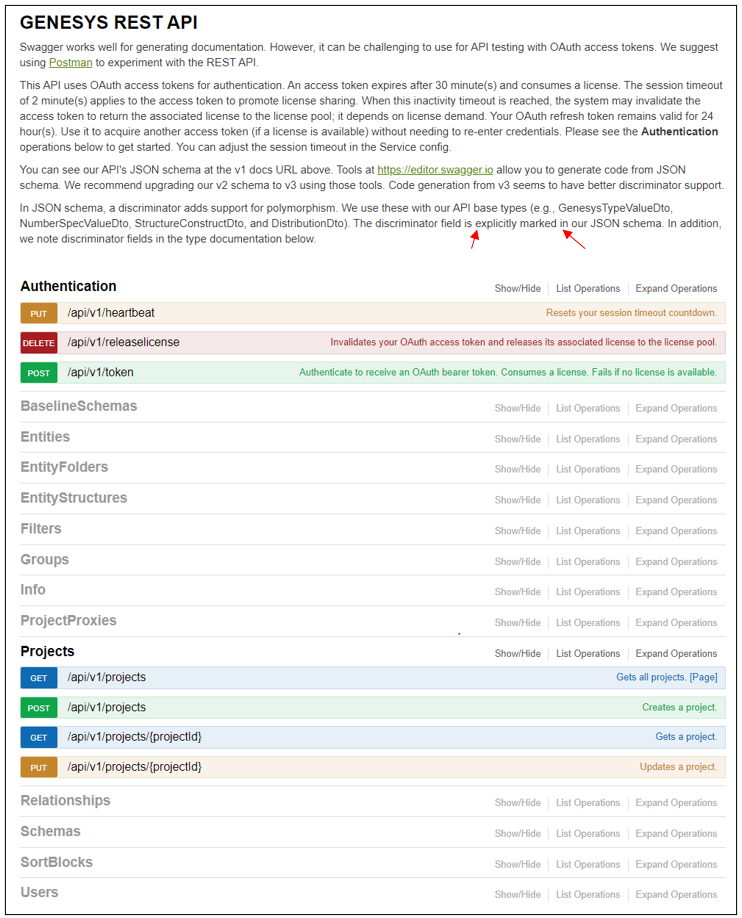 Figure 1 Swagger documentation for the GENESYS REST API
As with the other REST APIs in this series, the Syndeia user must know the integrated repository API’s endpoints. The GENESYS API documentation shown in Figure 1 has separate sections featured in the video, including Authentication, Projects, Entities (e.g. components and requirements), and Schemas (datatypes). The initial endpoint of importance is api/v1/token.
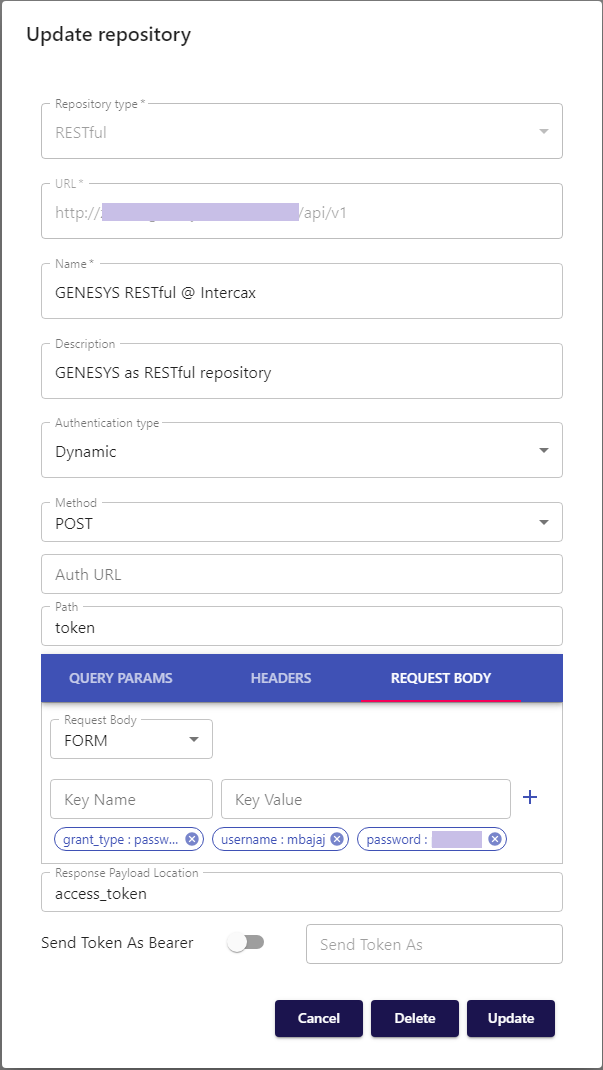
The dynamic token authentication mechanism is somewhat more complex than those described in earlier posts. The user creating or updating the repository connection in the Syndeia Web Dashboard is not entering the token itself, but the information necessary to allow GENESYS to create the token. This includes
- the URL of the GENESYS repository
- Name and Description for the repository connection
- the Authentication type – Dynamic
- the Method and Path – POST and token (see Figure 1)
- the Auth URL, if the token generation request needs to go to a different address (optional)
- three Request Body Key Values
- grant_type
- username
- password
- the Response Payload Location, the field in the Response that carries the OAuth token
- the Send Token as Bearer switch, with two positions
- left, token as bearer (default)
- right, token as header
After completing this form, click Create or Update to save the repository connection.
The remainder of the video follows the usual pattern of showing how Requests may be specified using the standard template. One non-standard issue is the need for a class or datatype id to identify the type of GENESYS Entity to be queried. These are obtained through a separate call using the /api/v1/projects/{projectId}/schemas endpoint.
The request for Components in a Project returns a complex set of data. Figure 3 shows the first part of the response, including 40 separate components.
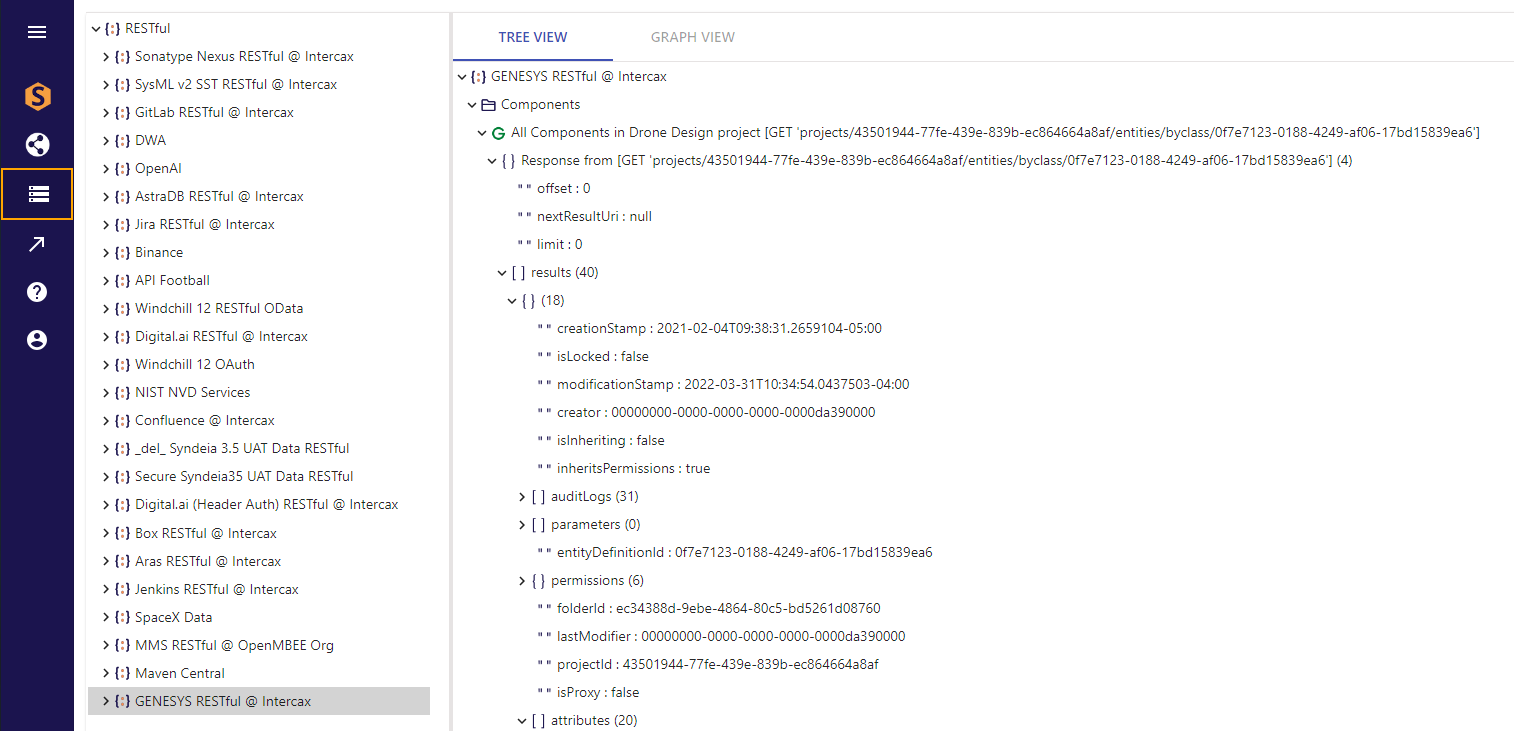 Figure 3 Response to Get All Components in Drone Design project (top section)
Useful information, such as the name and part number are buried deep in the data set under Attributes, as shown in Figure 4.
 Figure 4 Response to Get All Components in Drone Design project (expanded attributes section)
Because of the need for two API calls, one for type information and one for the data itself, and because of the size of the data set returned, the video suggests that creating a script using a Jupyter notebook with the same API calls is more practical for obtaining the needed information on a regular basis.
In summary, the videos described in this blog series are valuable training guides for any user of the Generic RESTful API integration on the Syndeia Web Dashboard and a useful first step in learning to build your own custom scripts and interfaces using the Syndeia Cloud REST API.
Demo 29.6 - Integrating RESTful Repositories with Dynamic Auth Tokens (GENESYS)
Other parts in this series:
- RESTful API Integration Demos, Part 1 – No Auth
- RESTful API Integration Demos, Part 2 – Basic Auth (OpenMBEE)
- RESTful API Integration Demos, Part 4 – Static Bearer Tokens (GitLab)
- RESTful API Integration Demos, Part 5 – Dynamic Authentication Tokens (GENESYS) – (This Post)